
Gun Fitting Explained
Buying a gun that fits
As with my previous article on eye dominance, gun fit has not had the consideration it deserves amongst some shooters. It is widely accepted to be important by coaches; however I believe a significant amount of shooters may choose a gun for the wrong reasons. When an inexperienced or novice shooter ventures into a gun shop, they will naturally select a gun that is either within their budget or they like the look of. This is perfectly understandable, however a gun that doesn’t fit properly will require a degree of forcing the head into a position where the required “sight picture” is achieved i.e. having the master eye looking straight down the centre of the rib. In this scenario the shooter may convince themselves that the gun fit is adequate if they want it badly enough and of course the more unscrupulous shop keeper is on hand to validate the fit even further and “clinch the deal”.
In our sport, the ability to mount the gun consistently into the same place every time is paramount. Time taken pushing or shoving the head and shoulder into the right place, not only takes up valuable time, but encourages the shooter to look at the gun to check the sight picture and consequently shot consistency will suffer. The gun shop environment is also very different to that of the shooting ground so it is imperative that you bring as much of that environment into the shop with you when choosing a shotgun. In this article I propose to explore and describe some of the science behind gun fit, give advice on how to make any adjustments and offer some guidance for those who are contemplating the purchase of a gun.
Gun Up. Incorrect gun fit is easily disguised when the shooter is shooting “gun up” i.e. in the shoulder. Before calling for the target, they will have taken the time to adjust position and force the head and eye into a place where the master eye looks down the centre of the rib. This may give the shooter the impression of an adequate fit, but as the gun moves to engage the target, the body and head will naturally try to revert to more natural position and the shooter will inevitably recheck before pulling the trigger, which as already discussed includes looking back at the gun.
Gun down. If the shooter shoots gun down, gun fit is especially important as any adjustment to position is carried out whilst the clay is in the air, reducing time on the target and once again, potentially, tempting them to look back at the gun to check the sight picture. With both of these methods it is clear that the better the gun fit, the less likelihood of looking back at the gun and therefore, the more consistent the shot.
For those of you who have ever tried target shooting or have had an airgun, you will have noted that you must line up the target with both a rear sight and a foresight to achieve success. If your fall of shot is low, you have to raise the rear sight in order to provide the necessary elevation for your fall of shot. With the shotgun the same principles apply, except your eye in this case, is effectively the rear sight. It is fact that, if you raise your head, you will need to raise the end of the gun into your new line of sight which will cause your shot pattern to rise. Figures 1 demonstrates what should occur if the shooters head is in the right position. Figure 2 and 3 demonstrates what can occur if the shooters head is in the wrong position.
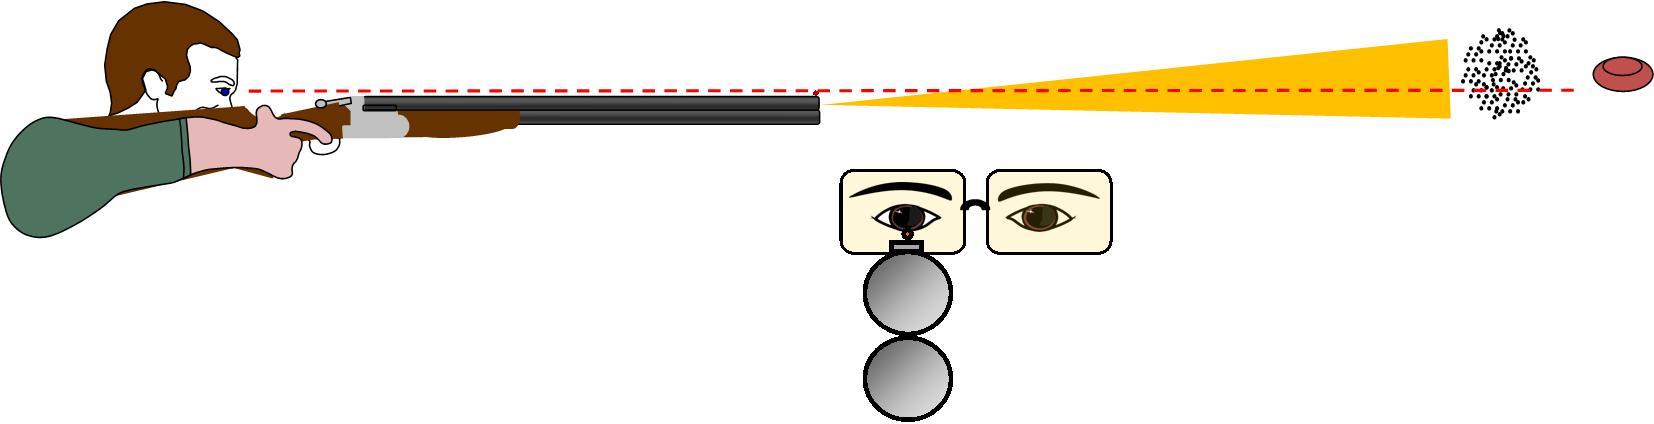
Figure 1
In figure 1, the shooters head is in the correct position so that he can see down the rib. Note the shot pattern will intercept the clay.
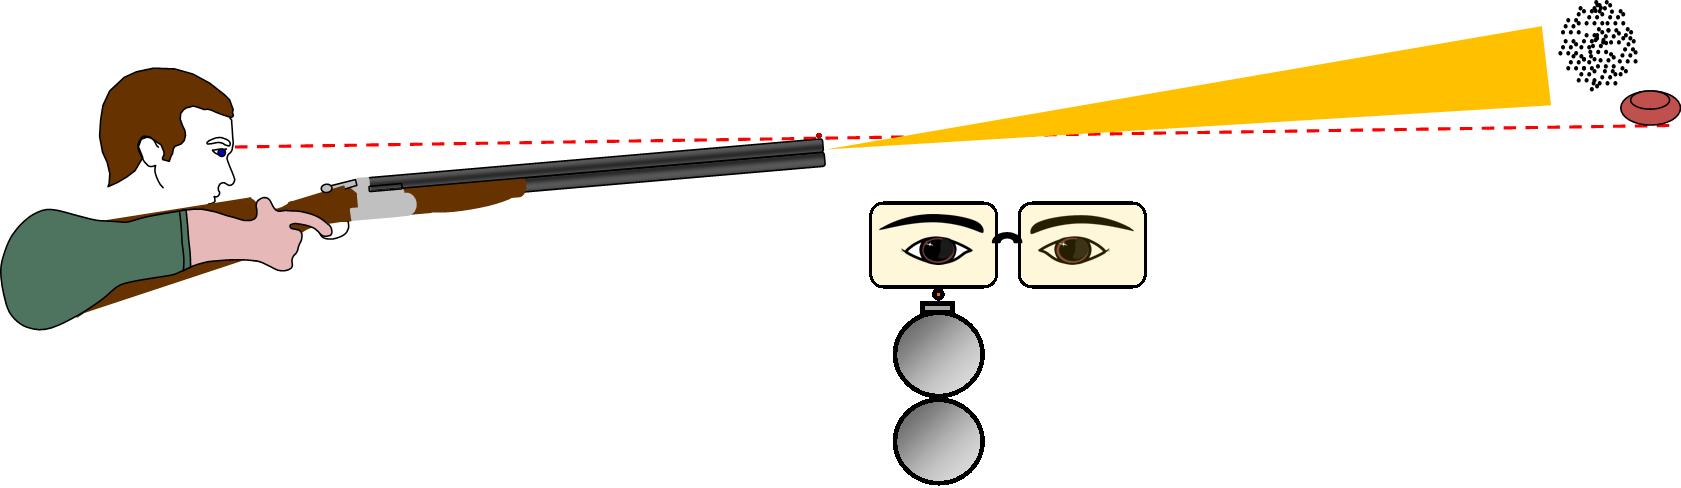
Figure 2
In Figure 2 the shooters head is too high, so when he perceives he is pointing the gun at the target he is in fact shooting high. Of course this diagram is not to scale, but you can see that over a given distance he will miss over the top of the target.
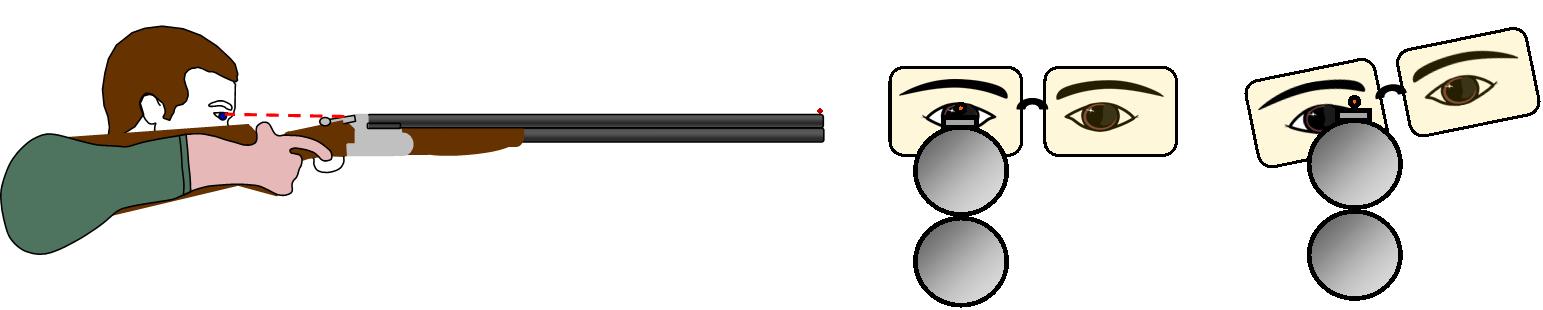
Figure 3
In Figure 3 the shooters head is too low so he is looking straight into that back of the gun, this normally causes the off eye to take over and the head to cant (as shown in the image on the right) causing issues similar to a shooter with an eye dominance problem. Note: Canting the head can also be caused by gun cast, more on this later.
Gun Fitting
The three terms we refer to when gun fitting are Length of pull, Drop at Comb and Cast, The length of pull is the distance from the trigger to the butt plate, and the drop at comb is the distance the comb has dropped from an extended line back from the rib. The cast is the amount of bend that is in the stock either to the left or right to bring the shooters master eye in line with the rib.
To establish the correct gun fit there are a few basic guidelines that we use to ensure these three measurements are correct for the individual. These basic guidelines, or steps, are by no means exhaustive as personal preference plays a key part here, especially when shooting different disciplines such as Skeet or Trap; however, we will need to establish a baseline. Firstly it is vital that the shooter adopts the correct stance. I have often had clients ask me to adjust their stock after being advised that it is the wrong length when sometimes just the adjustment of the shooters stance is all that is required.
Step 1-Stance. The most stable platform to shoot from is with both feet flat on the ground, shoulder width apart and the leading foot pointing towards the break point. The trailing foot should be at roughly 45 degrees to the front foot. If you then lean slightly forwards so that your nose is over your toes with 60 per cent of your weight on your front foot, you will be then in the correct stance. The gun is then placed in the shoulder pocket so that the top of the comb is in line with the top of the shoulder. Figure 4 shows the correct stance with the gun placed in the shoulder correctly.
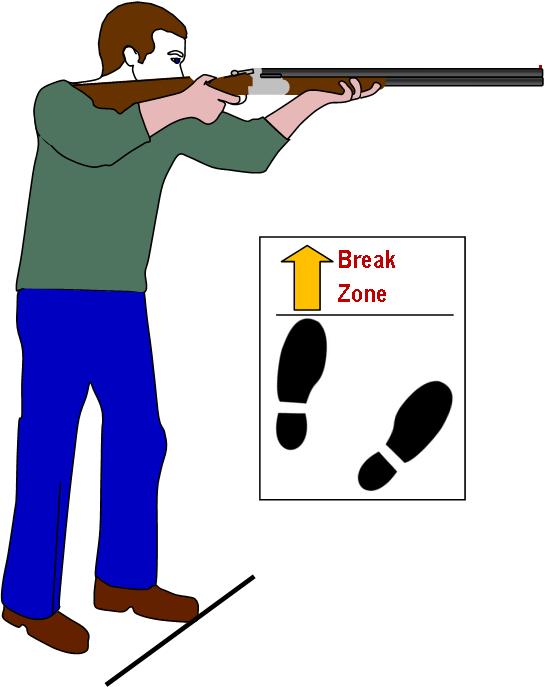
Figure 4
Step 2-Length of Pull. Once the shooter is in the correct stance with the gun in the correct position, we need to ensure that the length of pull is correct. We determine this by looking at the distance between the nose and the thumb as shown on the left in figure 5. The optimum distance is about two to three fingers, however, skeet shooters may prefer it shorter and trap shooters may prefer it longer.
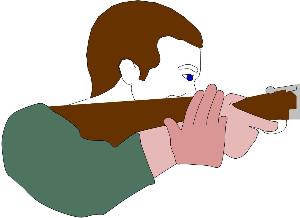
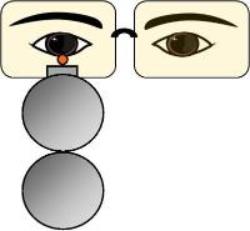
Figure 5
Step 3. Drop at comb. Next we need to establish the height of the shooters eye in relation to the rib and we do this by standing in front of the gun and looking down the top of the barrel towards the shooters eye.
Important: Before carrying out this activity it is imperative that you visually confirm with the shooter that the gun is empty before standing in front of the barrels. You should also ensure you are wearing safety glasses.
Stand in front of the gun so that you are looking down the top of the rib. The picture you are looking for is a figure of eight with the pupil and the bead of the gun shown on the right at figure 5. Beware of the shooter lifting their head at this point to see over the rib. If the shooter subsequently lifts their head to see, it will give you the false impression that the master eye is in the correct position. Make sure you ask him to lower his head so that his cheek bone just rests on top of the gun. Some shooters prefer not to shoot like this and just rest their cheek gently on the side of the gun; however I believe the best way to ensure that your eye will be in the correct position every time you mount the gun, is to have a tangible reference i.e. the stock touching the underside of the cheekbone. This ultimately means that you do not need to look at the gun to ensure you have the correct sight picture because you can feel when it is right. I use the analogy of a micro switch with my clients when explaining this, in that once the stock touches the cheek bone the micro switch is made and the green light goes on in your head to say the gun is in the correct position, enabling the shooter to remain focused on the target at all times.
Note: It is important to have carried out the length of pull measurement before you check the height of the eye because given that the stock slopes backwards, the position of the head on this slope will affect the height of the eye in relation to the rib.
It is also important to fully understand how eye dominance (see previous article) can affect the shooters eye position here. If the Off eye is interfering, the head will tend to cant over similar to the image in figure 3. It is important to differentiate what is a gun fit issue or eye dominance problem at this point.
Now that we have established what we are trying to achieve, I have included two pictures to show how different stances can affect gun fit. The left hand image at figure 6 shows the shooter standing side on to the target. You will notice that the head position is much further forward than recommended and you will also see that the shooter is standing more upright, without the nose over the toes, nor is 60 percent of the weight on the front foot. Another side effect of this sideways stance is that the gun butt will tend to be placed on the shoulder or even on the top of the arm instead of in the shoulder pocket.
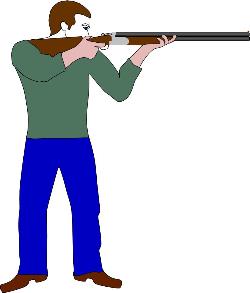
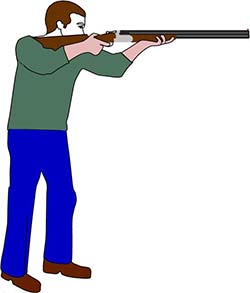
Figure 6
To sum up, if you have to lift your head to see over the back of the gun, it probably doesn’t fit you. Now please don’t go out and demand your money back from your local gun shop, most guns have been made to accommodate the average shooter and it makes perfect sense for the manufacturers to make the drop at comb a little on the low side to accommodate the “majority” of people. As I have said before some shooters prefer to mount the gun so that it just touches the cheek and are able to maintain a consistent mount throughout. If you can do this then there is no need to make any adjustment of any kind. If however you find yourself moving your head about on the gun to give you your required sight picture, you may find some “extra” adjustment will help.
Your Options
Firstly it depends what type of shooter you are. If you shoot, predominantly socially, a couple of Sundays a month and are not too bothered about your scores, then probably the best solution is to do nothing. Moreover if you have a consistent mount that enables you to put the gun in the same place without looking at the rib to check the height, there is probably minimal net gain from making any adjustments so again do nothing.
If you find you are moving your head to gain a sight picture during your mount and are keen to improve, then some adjustment is probably necessary.
How to make adjustments
The least expensive option is to make adjustments with the use of comb raisers and stock extenders. They are normally made of rubber and can be fitted or removed with ease. They do a good job, but they can be unsightly and not the sort of thing you may like permanently attached to your pride and joy. These devices are predominantly used for coaching and may not be suitable as a long term fix. What they do indicate, however, is the amount of adjustment required and they can be interchanged in order to achieve the best fit.
There are some more aesthetically pleasing types of come raiser and stock extenders available on the market, which are a real option providing a semi-permanent solution, if you are on a budget or the intrinsic value of the gun is such that the cost of a more permanent “fix” out weighs the value of the gun. I personally use “Kickeez” products for stock extension and their “cheekeez” range can also provide some adjustment both to height and the cast when fitted to the side of the stock. I mentioned earlier that head canting could be attributable to some cast issues; sometimes a cheek pad can push your head off the stock sufficiently enough to counteract this problem. “ Recoil Systems” also sell an inexpensive yet stylish leather effect comb raiser which you may wish to consider if you just need to raise the head.
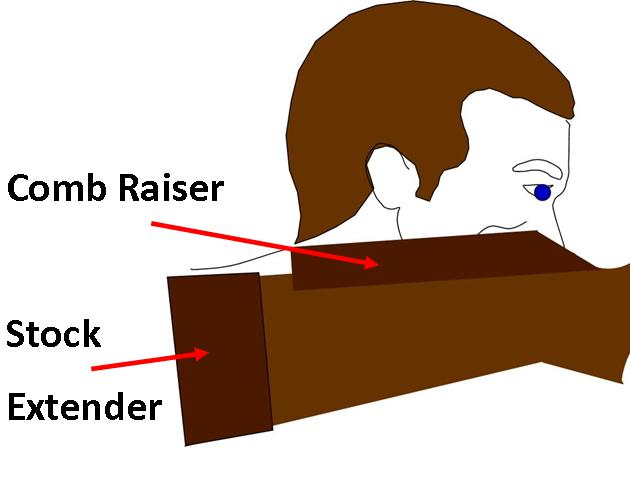
Figure 7
Retro fitting an adjustable comb. An adjustable comb can be very useful and most gunsmiths will fit one for you.
Stock bending. It is possible to have the wood bent by a professional if required. There are some very competent stockists out there who can bend the stock to the correct position for you.
Have a custom stock made. Of course the best method of ensuring your gun fits is to have a stock made especially for you. Clearly the most expensive option, but with the best results.
Checking adjustments with a Pattern Plate
I have mentioned previously that there is a certain amount of personal preference when fitting a gun. The most important point here is that the gun should shoot where you want it to. Some people prefer to shoot seeing a lot of rib and some not so much. The best way to see if the fit is correct and that the gun will throw the pattern where you point it is the pattern plate. This will provide you with the evidence for where your shot is going. Most grounds will have a pattern plate you can use, even if it is just a large sheet of paper stapled to a pallet. The recommended distance to shoot at a pattern plate is 15m or 16Yards. You should also try to have your tightest choke in if possible. There are different opinions as to how you should shoot at a pattern plate and the CPSA advocate raising the gun and firing as your gun moves through the aiming mark. I believe there is a stage before this owing to a requirement to see how the gun is performing without any error introduced by the shooter. My advice would be to take an aimed shot at the centre of the pattern plate with the bead of the gun on the base of the aiming mark. The resultant pattern will tell you if your eye position is correct relative to where the gun naturally shoots. The shot pattern should lie about 60% high when carrying out this test. If your pattern is significantly high then you may need a lower head position and vice versa for a low pattern.
Tips for buying a gun.
- Be cautious of some gun dealers who use techniques such as laying the gun on your forearm to measure length of pull. This method really does not tell you much.
- If you are an inexperienced shot, practise your stance and mount before going into the shop. This muscle memory will help you mount to the correct position so that you will have the best chance of finding a gun that fits you properly.
- Take someone with you who really knows what they are doing and try a selection of guns as they all come in all shapes and sizes.
- Try to wear clothing similar to what you will shoot in. It would also be wise to take your shooting jacket.
- Try not to make a gun fit you if it is a bargain. You may regret it later. The best thing to do is to mount the gun with your eyes closed until it is comfortable and then open your eyes. You will then see whether it fits you. You could also do this in front of a mirror if it helps.
- Ask the gun dealer to alter the gun to fit you if required. If it is an expensive gun he will probably not charge to do this. If not it might be worth paying for it to be done.
Eye Dominance Products

Do you see two gun barrels when you focus on the target, Do you feel you are looking down the side of the Gun when shooting, Do you have to focus on the gun bead to get rid of the blurred barrels, Do you have to shut an eye to see the target clearly?
Are your scores suffering as a result? There is a good chance you have an eye dominance problem.
